This is how I made my 18" x 14" Prize Wheel
First I looked on the internet at Pinterest, You Tube and EHow for directions and ideas.
I found several pages that gave directions and took the easiest ideas from each.
Items I needed:
- Wooden Lazy Susan (found a Bamboo on at Walmart for $13.99)
- Paint (.99 cent acrylic paint, clear spray-gloss & black spray paint)
- Small Paint Brush
- Screws
- Nails & Hammer
- Wood Back Board (just a scrap I had around the house)
- Sharpie Black Marker
- Wood Glue (I used one from the brand Loctite)
- Zip Tie
- Stick-on Numbers (found the kind you put on your house at Walmart for $7.99 for three sets of 0-9)
- Pencil
- Ruler
- Cloth Tape Measure
- Light Grid Sandpaper
- Wireless Power Drill w/ Drill Bit & Screwdriver Bit
First I must tell you that you can get a small prize wheel (22 1/4" x 14 3/4") from Oriental Trading for $20 plus S&H, which would have saved me some money & time, but it's numbered 1-8 and I needed 0-5 for what I am doing.

I searched all over the place for a wooden Lazy Susan, only to find it in the last place I looked: Walmart. I got the Paint, Wood Glue & Stick-on Numbers there too. I had the rest of what I needed around the house.
Note: you can save money by getting different stick-on numbers or using a template and painting them on!
- I used a light grid sandpaper to sand down the top of the lazy susan (so the paint would have a better surface to stick to).
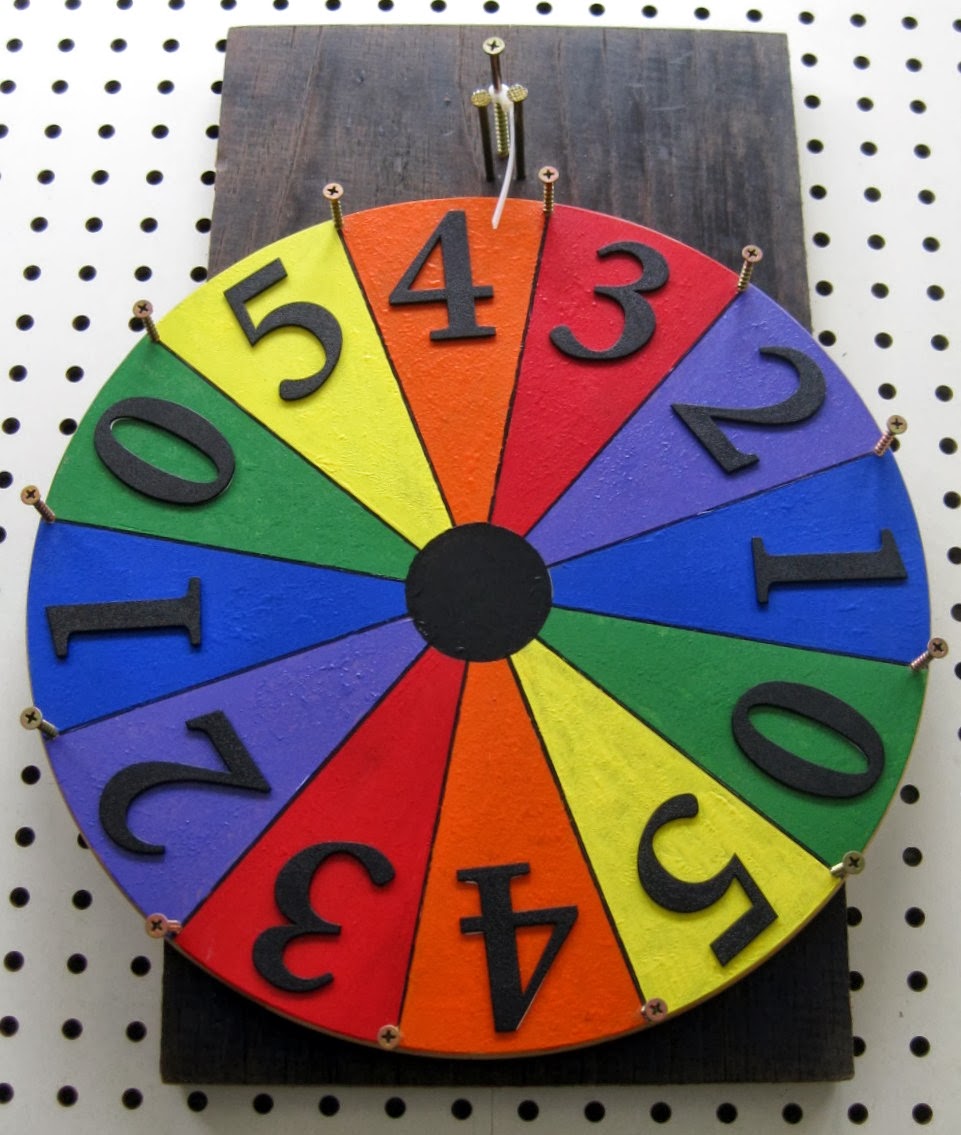
- I used the cloth tape measure to measure around the outside edge of the Lazy Susan, which turned out to be 44" (+/-), which I then divided up into 12 sections, each section being approx. 7 1/3". Marked the measurements on the board with my pencil, then used my ruler to draw the straight lines across the board into the 12 segments you see in the finished product.
- I then used a small paint brush and paint to paint different colors into the triangle wedges. Let it dry (which, being that it's winter & very dry at my house, didn't take long). As soon as it was all dry, I took a plastic cup I had around the house and used it to draw the circle in the center of the board, so I could paint that black. Then I took my black sharpie and drew black lines between the colors (this hides all of my painting inconsistencies.
- I then placed my numbers centered in each wedge. I know these numbers were on the expensive side & I could have painted the numbers, or found a less expensive stick-on, but I really liked them when I saw them & made a spur-of-the-moment purchase.
- I then used a gloss acrylic spray paint to put a protective finish to the whole board.
- Next I used the drill bit and the power drill to pre-drill holes at the end of each black line (between the color segments) -- this was necessary for 2 reasons: 1. it is a bamboo wood board, which is really difficult to screw into without the pre-drilled holes, and 2. the holes are located at the very edge of the board, and would probably crack the wood if I tried to screw into it without the holes.
- Next I screwed in the 12 screws into each hole (these are a wood screw that I had left over from building my fence, they are approx. 1 3/8" long) - I chose these screws because I felt they would be tall enough, once screwed into the board, to be able to be hit by the "clacker" which is used to slow down the wheel.
- Now that the Lazy Susan was looking very much like a prize wheel, I needed to put it onto a base so that I could make the "clacker".
- I found an 18" left over piece of 1x10 sitting in my basement, which seemed like it would work perfectly. It had some water staining on the bottom of it, so I used some black spray paint to cover it up and make it look nice (and again, since its winter, it dried really fast).
- The next part took a little bit of "eye-balling"... I set the lazy susan on the 1x10 on the spot I wanted it to sit, then got down and looked at it from the side and marked where the base would sit on the board, turned the board over and drew the lines across the back - did some measuring and marked the center of where the base would sit. Then I drew a circle (using the same plastic cup as I used before) and drilled 4 holes where the circle intersected with the lines (I had to drill the holes through the 1x10 as well as the base of the lazy susan (because the lazy susan is bamboo and hard to screw into without a starter hole).

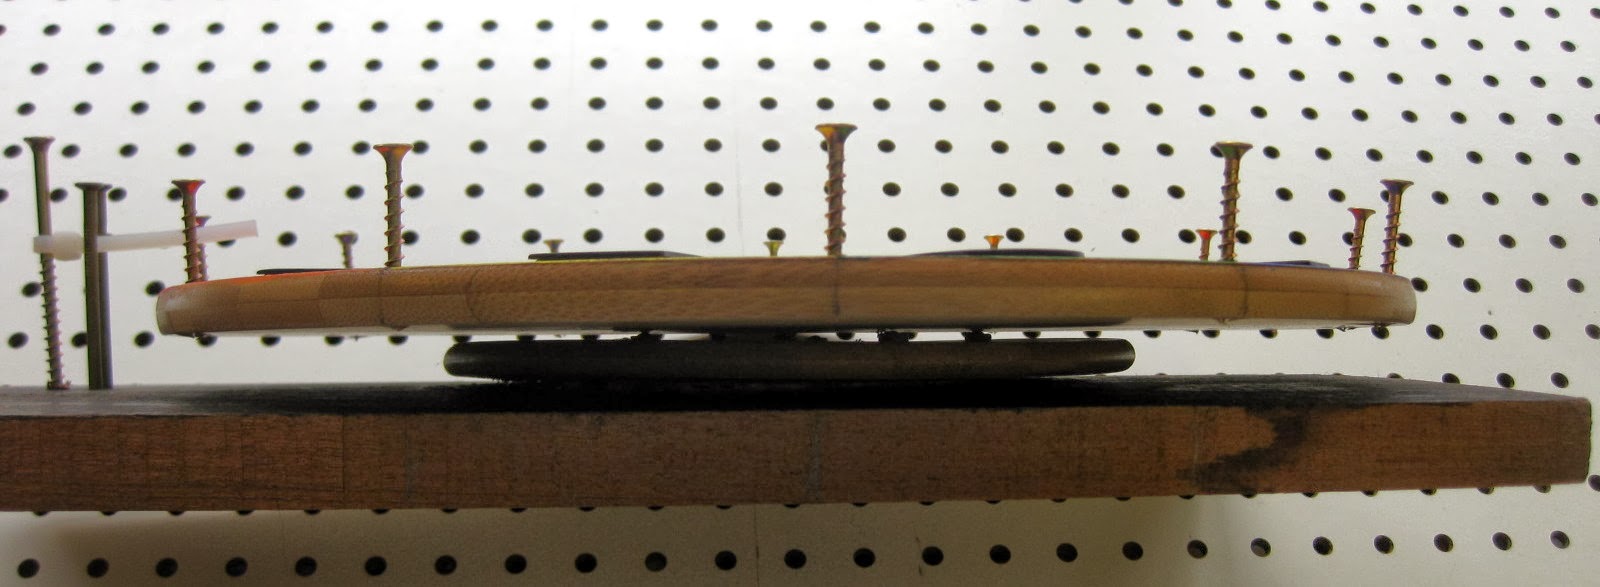
- Next I used the wood glue to glue the lazy susan down to the 1x10 and let it sit for a while.
- Then I flipped it all over and had my Mom hold it all down (because a lazy susan will spin when you screw things into it, if you don't hold it down!), while I screwed in the 4 screws into the back. The screws I used were of a length that they would go through the 1x10 and into the lazy susan base with-out going through the base and into the turn table on top. I chose the length by "eye-balling" several of them up against the side of the board with the lazy susan on top. I have a lot of screws around the house, so I could do that... If you need to buy them, I would suggest maybe something about 1 1/4" long.
- Once that is done, the last thing I needed to do was attach the "clacker" which is only 3 long nails or screws or a combination of each. I used 2 long nails & 1 long screw, because that's what I have at the house, so I didn't have to buy any. The nails were approx. 3-1/4", while the screw was approx. 3-5/8" tall.
- I nailed the 2 nails on the 1x10, side by side leaving a small space between them for the zip-tie to fit through, approx. 1" from the wheel. Then I screwed in the long screw approx. 3/8" behind the nails, centered between them.
- Then added the zip-tie to the screw, fitting it between the nails, and cut it to a length that would allow the wheel to spin, but put enough counterbalance pressure to slow it down and stop it at one of the colored & numbered wedges.
OMG I just made this and it is too cute!! I can't stop playing with it. Thank you for the awesome tutorial!!
ReplyDelete